Saturday, 31 December 2011

Jammin' session

Ok, bad pun, but it was time to turn the remaining Friar's Hat chillies into jam.  I did an extensive five minutes search on the web and  and came up with a recipe, ignored any bits I didn't like and set to work.
Friar's Hat (or Bishop's Crown) chilli
Ingredients:
150g Friar's Hat Chillies
1 large red pepper
1 kg of Jam Sugar
600ml of cider vinegar

The plan is to dissolve the sugar in the cider vinegar over a low heat (without stirring apparently),  Meanwhile, blitz the pepper and chillies in a food processor until nice small chunks.  The original recipe called for deseeding the chillies first but that seemed like a waste so I left them in.
The blitzed chillies and pepper
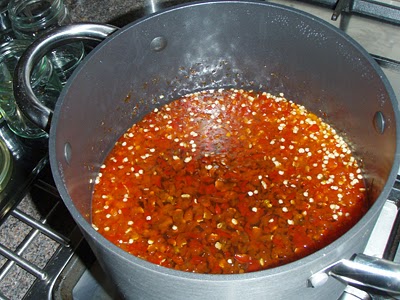
Once the sugar is dissolved then add the chilli & pepper mixture and bring to a 'rolicking' boil for ten minutes. Once this is done, allow to cool for forty minutes and then ladle into sterilised jars.

The syrupy mixture after boiling.
Couple of important notes at this stage.  Firstly, you need to boil without the saucepan lid on.  I know this would seem obvious to seasoned jam makers but to a novice like me it wasn't immediately clear.  Secondly, you really do need to have the jam going on a good boil and even then, ten minutes might not be long enough.

As it was, my original batch didn't set when cool so I poured it back into the pan, re-boiled it for longer and this time it set.
Save any old jam jars you can, they'll come in handy
As for flavour, well, it's got a great heat. Not volcanic but a creeping heat at the back of the throat which is what I really like. It's very sweet with all the sugar in there and really very tasty.  I think in the next batch I would add some more flavourings, maybe some ginger, garlic or even some apple would be nice.

All I now need do is think of a name for this concoction.
Altogether, despite having to reboil the jam, it's turned out a success and certainly a great way of using up and preserving those extra chillies at the end of the season.

As for news on the growing front, well with the addition of a new (and even bigger) growing light, the seedlings are doing well.  The LED light didn't cover a large enough area for the number of plants I've got so with a hastily rigged light box (thanks to Bacofoil) my new CFL light is keeping the little plants very happy, with many, particularly the Loco and Tabasco seedlings shooting away.

The new CFL unit
The LED light has been (somewhat precariously) balanced on top of the aquarium propagator so that the new seedlings germinating in there are immediately treated to a blast of light as soon as they emerge.  So far things seem to be going well there with a very high germination rate, particularly with the Chocolate Habanero and Chilhaucle Negro seedling with 100% success.


Tuesday, 27 December 2011

Using up left-overs...

...which is something of a Christmas tradition.  However, in this case it refers to the glut of chillies left at the end of the season. I popped in to visit my parents the other day and in my mum's greenhouse was a forest of Friar's Hat and Orozco chilli plants, still laden with unripe fruit.  Now this has been an exceptionally mild winter so far but even I was surprised to see quite how much fruit was still on the plants in December.  So in exchange for cutting back the plants for her, ready for overwintering, I got to keep the remaining fruit.

The Orozco chillies are mild when picked immaturely but when given the chance to fully ripen to a bright red can pack a punch.  Along with a few other chillies I had left, I dried them off in a low oven for a couple of hours and then I'll grind them for flakes.

Dried Orozco, Cayenne and Friar's Hat Chillies
The Friar's Hat chillies I'll leave on a bright windowsill for a few days to ripen and then as soon as I can face the idea of post-Christmas shopping (i.e. as soon as I've run out of food and can't face eating any more mince pies) I'll buy some high-pectin sugar and have a go at turning them into chilli jam.

Unripe Friar's Hat Chillies
I've got a few recipes from the web and, if it's a success, I'll try a number of different mixtures and strengths over the year.
The first crop of Pimientos de Padron
In other news, I picked the very first of my Pimientos de Padron on Christmas Day.  Just four thumb-sized chillies for now but plenty more on the way.  I've given them to Claudio to test as, not only was he the inspiration for growing them, but having grown up in Galicia, he should be the best judge of their authenticity.
Monkey Face and Chocolate Habanero Seedlings.
Finally, the Monkey Face and Chocolate Habanero seeds I planted on the 18th of December have started to sprout.  There's about three of each showing at the moment.  Just 8 days from being planted to sprouting, that's not bad at all. Proof that the aquarium propagator does do the trick.  Now I need to ensure that I don't kill them off like the last unfortunate batch!

Thursday, 22 December 2011

Disaster and recovery (hopefully)

So back in October I planted a huge number of seeds of 10 different varieties of chilli.  I knew that spring would be busy so if I could get a head start with half of the varieties I planned to grow it would make life easier.  Things went well and within a couple of weeks I had some seedlings showing.
October 1st 2011
October 16th 2011
Then disaster struck.  I went away for a weekend and foolishly overwatered them in anticipation of them drying out.  When I got back there was a very sorry sight awaiting me, most of the seedlings had fallen foul of damping off, a fungal infection which is made worse by overly damp conditions and not enough air circulation. I managed to rescue a few of the poor, drooping seedlings but many died and those that were left were weak, spindly and lacking leaves.  With winter drawing and shorter days, their growth was hampered further by the lack of sunlight.

So, in an attempt to repair the damage I've invested in an LED grow-light and am now subjecting the remaining seedlings to 18 hours of light a day. I opted for the LED light because firstly it was cheap to buy and very economical to run.  Secondly it's cool running so I've been able to bolt it underneath a table, close to the plants without fear of scorching them or setting fire to the house.  I've made some reflective walls for their little grow-room with some kitchen foil and card to reduce  any spillage of the light and where possible will get them as much natural daylight as I can (not easy with how crowded my windowsills currently are!)
The miniature grow-room in action.
Admittedly the light isn't particularly powerful (14W) but with only 8 hours of sunlight on a good day at the moment I'm hoping it will do the trick in promoting a growth spurt.

So far the plants have been under the light for nearly a week and it certainly doesn't seem to have done them any harm.  It'll take a while longer to see if there are any huge benefits but certainly the seedlings are looking healthy even if they haven't grown significantly yet.

Monday, 19 December 2011

Eco friendly growing

I thought I'd try something different this time with my latest batch of seeds.  I few times recently when potting on the seedlings I've very clumsily damaged the delicate plants which has led to plenty of bad words and recrimination.

Ideally I want a way of being able to transplant the seedlings into bigger pots without having to disturb the roots. I've looked at those Jiffy pellet systems but being a cheapskate I decided to try something a little more 'Blue Peter' in style.  So I dutifully collected my toilet and kitchen roll tubes and set about turning them into plant pots.

Eco friendly planting
Basically you take the tube, flatten it with your weapon of choice, open it out and flatten it again to give four creases running the full length. Cut it into sections (in half works quite well for toilet roll tubes) and open it back out.

Cut a short slit, approximately 15mm or half an inch depending on your currency, on each of the creases and fold the resulting flaps down. Fold them inwards, overlapping them so that they form a base.  Finally give the centre of the sides a gentle squeeze so that they take on a squarer shape.

Hey presto, your planters are now ready for seeds.  Once the seedlings are ready to be potted on you can plant the whole pot into the compost and it will rot away, hopefully leaving the roots untouched.  It may be necessary to open the flaps in the base if they haven't sufficiently rotted by that stage, we'll wait and see on that score.

And for the test, well, I've chosen to try out two new varieties for me, the beautifully coloured but fearsomely hot Chocolate Habanero and the milder but fantastic looking Monkey Face. They're now safely housed on top of the aquarium propagator.

Chocolate Habaneros and Monkey Face, December 2011

The Great Chilli Race

Sometime ago my friend Neil and I decided to have a little friendly competition growing chillies.  I duly supplied him with a couple Pimientos de Padron plants and we set to work seeing who could grow the largest, healthiest, most fruitful plant.  Now it turns out that Neil has a secret weapon in the Great Chilli Race.  Namely a sunlit kitchen with an Arga. So sat on a south facing windowsill and warmed all day by the Arga they've shot up, are covered in flowers and are now thoroughly dwarfing my plants.

The only consolation is that they're not yet fruiting but I'm sure it won't be long before they're laden and I'll be eating humble pie whilst they dine on tapas.
Neil's Piminetos de Padron: December 2011

Saturday, 17 December 2011

Pimientos de Padron

Back in the summer my girlfriend introduced me to tapas, and in particular, the small sweet Pimientos de Padron peppers.  Her father is from the Galicia region of Spain, home to the town of Padron and this fantastic tapas dish.
Pimientos de Padron, December 2011
The peppers are picked before they fully ripen and cooked in olive oil with coarse salt. As we discovered, it's worth having a lid on the frying pan when you do this as the scalding oil has a tendency to spit everywhere.  Pat them dry with paper towel and serve hot. You eat the pepper in its entirety, just discarding the stalk.

When you taste them they're mild but about 10% have a kick.  Not enough to blow your head off but certainly hot enough to provide amusement to your fellow diners.  At our tapas party it became a game of Spanish Roulette, waiting to see if anyone had a hot one.

Subsequently I picked up a few packets of seed and although it was the wrong end of the season I planted them and just to see how successful I would be.  The answer was pretty good actually.  Of 36 seeds planted I had 30 come up.  They were robust little seeding and I didn't loose any to damping off.  I put this success down to the fish-tank propagator I use.

All of my seeds are germinated in propagators on top of the aquarium and the constant heat from the lights warms the compost and ensures a good success rate. By comparison, an identical batch germinated in a conservatory had only two survivors, I think the extremes of temperature from day to night probably did the damage.
October 2011
So that was back in september, the plants were later moved over to the windowsill and then about half were transported into work where, with a south-west facing window and a nice warm office they've flourished.  For the Christmas break they've been moved back home so that they don't suffer when the heating at work is shut off which means I'm very short on windowsill space.
On the windowsill at work, November 2011
The average plant is now about 15" tall, most have some flowers on the way and two are already bearing fruit.  I don't suppose I'll have enough for a full tapas dish but it's early days yet.
The flower of the Padron

Pimientos de Padron, December 2011

Genesis (almost)

So this is the first post in my new blog.  For a while now I've been toying with the idea of running a Blog on my chilli growing efforts and now, with a few days off work looming, I've got the opportunity.

Firstly I will apologise (or justify) the title of the blog.  I do not own a chilli forest.  I'm something of a novice at horticulture and although I've managed to cover all my windowsills with plants it still has sometime to go before it can truly be described as a forest.  Currently I'm thinking "forest-ette" or even "bush" might be more appropriate.

However, I do live in the Forest of Dean so I'll use that tenuous link to justify my arboreally ambitious title.

So where to start...?

I've been growing chillies for six months or so now, having inherited a trio of plants from my green-fingered parents.  Those small plants rapidly expanded into bushes and I started saving, buying and planting my own seed. I now have over 50 seedlings on the go and close to 30 mature or maturing plants.

The intention of this blog is to document my efforts over the next year in growing an interesting variety of chillies, the recipes I use them in and the success (or otherwise) of the various growing techniques.

The beginnings of the forest